
Introduction
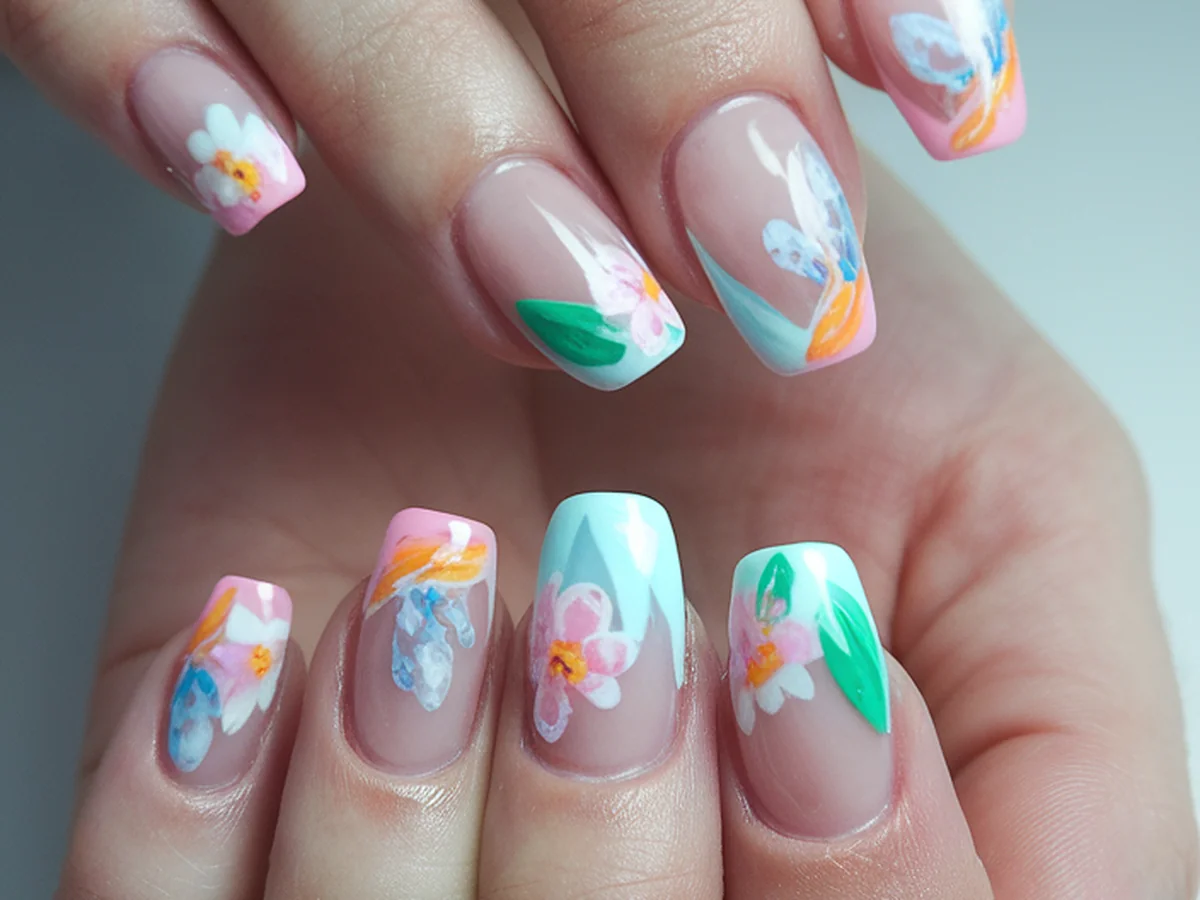
Nail art has blossomed into a vibrant form of self-expression, captivating enthusiasts worldwide with its limitless creativity. From minimalist designs to intricate patterns, nail art has become a favored trend, especially as people seek unique ways to showcase their personalities. Seasonal trends play a significant role in nail design, with spring bringing a refreshing burst of colors and themes. Among the many styles, the classic French manicure stands out due to its elegance and versatility. This timeless technique can be beautifully reimagined for the spring season, allowing you to create stunning masterpieces that reflect the essence of renewal and growth. In this article, we will guide you on how to design your own spring-inspired French nail art, encouraging you to unleash your creativity and craft your nail art masterpieces.
“Creating a cozy reading nook is all about maximizing comfort in a small space. It’s about intentional design that serves both function and feeling.”
– Interior Design Magazine
Understanding French Nail Art
French nail art, often characterized by its simple yet chic appearance, dates back to the 1970s. It was initially popularized by a French cosmetics company aiming to create a natural-looking manicure that complemented various outfits. Traditionally, a French manicure features a nude or pale pink base with white tips, creating a clean and polished look. This technique is not only timeless but also serves as a perfect canvas for artistic expression.
The beauty of French nail art lies in its adaptability; you can easily switch up the colors and designs to reflect your personal style and the season at hand. Whether you’re dressing for a casual brunch or a formal event, French nails can be tailored to match any occasion, making them a go-to choice for many. By adding your unique flair to this classic style, you can create a fresh look that embodies the spirit of spring.
Spring Color Palette for Nail Art
As winter fades away and nature awakens, spring brings a delightful array of colors that can inspire your nail art. This season, think pastel shades—soft pinks, mint greens, baby blues, and lavender—as well as vibrant hues like sunny yellows and coral. These shades not only evoke feelings of warmth and joy but also create a playful atmosphere perfect for spring.
When selecting your spring color palette, consider combinations that harmonize well together. For instance, pairing a soft peach with a mint green creates a refreshing look, while blending lavender with a sunny yellow can brighten up your style. Remember to choose colors that complement your skin tone; warm undertones look stunning with peachy or golden shades, while cooler undertones shine with blues and pinks.
Additionally, incorporating metallics and glitters can add an exciting twist to your designs. A subtle gold or silver sheen can elevate your French tips, making them pop without overwhelming the overall look. Experiment with various combinations to find the palette that speaks to you and captures the essence of the season.
Essential Tools and Materials for Nail Art
Creating beautiful spring-inspired French nails requires some essential tools and materials. First, gather the following basic tools to help you achieve your desired design:
| Tool | Purpose | Recommended Brands |
|---|---|---|
| Nail File | Shapes and smooths nails | Essie, OPI |
| Dotting Tool | Creates dots and detailed designs | Born Pretty, Sally Hansen |
| Nail Brush | For painting intricate designs | Royal & Langnickel, Kolinsky |
Next, you’ll need a selection of high-quality nail polishes. Brands like Essie, OPI, and Zoya are popular choices for their vibrant colors and long-lasting formulas. It’s crucial to use a good base coat to protect your nails and a top coat to seal your design and add shine. These products not only enhance the longevity of your nail art but also ensure your nails remain healthy and vibrant.
Investing in quality nail art supplies will make a noticeable difference in your nail art experience. While it may be tempting to opt for cheaper options, high-quality products yield better results and are often easier to work with, allowing you to create stunning designs with ease.
Step-by-Step Guide to Creating Spring French Nails
Creating your own spring French nails is a fun and rewarding process. Follow these steps to achieve a beautiful design:
1. Prepare Your Nails: Start by ensuring your nails are clean and well-shaped. Use a nail file to achieve your desired length and shape, then buff the surface to create a smooth canvas. Clean your nails with a gentle polish remover to remove any oils or residue.
2. Apply the Base Coat: Next, apply a thin layer of base coat to protect your nails and promote adhesion. Choose a light, neutral color as your base—soft pink or nude works beautifully for this season.
3. Create the Classic French Tip: Once your base coat is dry, it’s time to add the French tip. Using a small nail brush or a nail art pen, dip it into your chosen tip color (typically white for a classic look) and carefully paint a crescent shape along the tip of each nail. For a spring twist, consider using pastel shades like lavender or mint green instead.
4. Add Spring-Inspired Designs: Now comes the fun part! Use your dotting tool or brush to add delicate floral designs, butterflies, or any other spring motifs you love. Think about cherry blossoms or dainty daisies for a fresh touch.
5. Seal Your Design: Finally, once your designs are dry, apply a top coat to protect your art and add a glossy finish. This will not only enhance the look but also help your nail art last longer.
Incorporating Spring Themes into Your French Nail Art
Spring is all about new beginnings, and your nail art can reflect that through various themes and motifs. Floral designs are a timeless choice; consider incorporating cherry blossoms, tulips, or daisies into your nail art. These can be painted delicately on the nail bed or as accents on the tips.
Geometric patterns also make for a modern spring look. Combine pastel colors with crisp white lines to create stylish designs that reflect the season’s vibrancy. You can experiment with stripes, triangles, or even polka dots to add an eclectic touch to your French tips.
Another exciting trend is utilizing negative space, where part of the nail remains unpainted, allowing your natural nail to show through. This technique can create a modern twist on traditional French nails while still maintaining a fresh, spring-like feel.
Lastly, consider integrating seasonal symbols such as rainbows or sunshine into your designs. These playful elements can bring a whimsical charm to your manicure, making it perfect for the joyful spirit of spring.
Nail Art Techniques to Elevate Your Design
To truly make your spring-inspired French nails stand out, consider incorporating advanced nail art techniques. Nail stamping is one such technique that allows you to transfer intricate designs onto your nails quickly. With a stamping kit, you can easily create complex patterns that might otherwise be challenging to paint freehand.
Water marbling is another creative option for achieving unique effects. By swirling different nail polish colors in a bowl of water, you can create stunning designs that resemble abstract art. While this technique requires some practice, the results can be breathtaking.
Ombre techniques are also popular, allowing for a smooth gradient effect from one color to another. This can be especially appealing in spring colors, transitioning from a soft pink at the base to a vibrant coral at the tips.
Lastly, consider utilizing nail decals and stickers for a quick and easy way to add flair. These can be found in countless designs that cater to spring themes, from floral patterns to cute animals. They’re a perfect option if you’re short on time but still want to achieve a polished look.
Maintenance Tips for Your Spring Nail Art
Once you’ve created your stunning spring French nails, you’ll want to maintain their beauty for as long as possible. Start with the basics: keep your nails healthy by regularly moisturizing your cuticles and avoiding harsh chemicals. This will help prevent breakage and maintain a smooth surface for your nail art.
To prolong the life of your nail design, avoid exposing your hands to excessive water and harsh detergents. Wearing gloves while doing chores can protect your nails from chips and wear. Additionally, apply a top coat every few days to refresh your manicure and add extra shine.
If you do experience chips, don’t fret! You can easily fix them by gently filing the area and reapplying the base and color. For larger chips, consider adding a decorative sticker or gemstone to cover the imperfection while adding a bit of flair.
If you find yourself struggling to maintain your nail art, it might be worth considering a professional manicure. A skilled technician can help ensure your design remains pristine and can offer additional techniques to enhance your look.
Inspo and Resources for Nail Art Enthusiasts
For those looking to expand their nail art skills and gather inspiration, the internet is a treasure trove of resources. Social media platforms such as Instagram and Pinterest are filled with talented nail artists who share their creations and techniques. Following influencers like @nailartbyqueenie or @nailsbymei can provide you with endless ideas and tutorials.
For more structured guidance, consider exploring nail art websites like Nail It! or The Nailasaurus, which offer tutorials and product recommendations. Mobile apps like Pinterest and YouTube can also provide a wealth of information, from beginner techniques to advanced designs.
Books such as “Nail Art 101” by Ayelet Avidar can serve as excellent resources for understanding various techniques and styles. Additionally, joining community forums and groups on platforms like Reddit or Facebook can connect you with fellow nail art enthusiasts, allowing you to share your work and receive valuable feedback.
Conclusion
Spring-inspired French nail art is a delightful way to express your creativity and embrace the beauty of the season. With its elegant foundations and endless possibilities for personalization, you can create unique designs that reflect your style and the joy of spring. Remember, the key to beautiful nail art is experimentation—don’t be afraid to try new colors, patterns, and techniques!
So go ahead, gather your tools, and let your imagination run wild. As you create your masterpieces, consider sharing your creations on social media to connect with fellow nail art lovers. The satisfaction that comes from designing your nail art is truly unparalleled, so why not indulge in this joyful form of self-expression?
Frequently Asked Questions
What is the best base coat for nail art?
Choosing a good base coat is crucial for the longevity and health of your nails. Look for a base coat that promotes adhesion and protects against staining. Brands like OPI and Essie offer excellent options that not only enhance color vibrancy but also help strengthen your nails. A quality base coat will provide a smooth surface for your nail polish and help your designs last longer.
How can I fix chips in my nail art?
If you notice chips in your nail art, don’t worry! You can fix smaller chips by gently filing the area to smooth it out, then reapplying the base color and top coat. For larger chips, consider adding a decorative element like a sticker or gemstone to cover the imperfection. This can add a touch of creativity while keeping your manicure looking fresh.
How do I choose the right colors for my skin tone?
Selecting the right colors for your skin tone can enhance the overall look of your nail art. Generally, warm undertones pair well with shades like coral, peach, or warm pink, while cool undertones look great with blues, purples, and pinks with a blue base. If you’re unsure, testing swatches on your nails before committing to a full design can help you find the perfect match.
Can I do nail art on short nails?
Absolutely! Nail art can be beautifully executed on short nails. In fact, shorter nails can provide a chic and clean canvas for intricate designs. Opt for smaller patterns and delicate details that suit the nail’s size. Bold colors or negative space techniques can also create stunning designs without overwhelming your shorter nails.
What are some common mistakes to avoid in nail art?
One common mistake in nail art is rushing through the process. Taking your time ensures better precision and cleaner designs. Another mistake is skipping the base and top coats, which protect your nails and enhance the longevity of your art. Finally, avoid using too much polish on your brush, as this can lead to uneven application and messy designs. Practice and patience are key to achieving beautiful nail art!