
Introduction
Spring is a season bursting with life, color, and creativity, making it the perfect time to express yourself through nail art. The charm of spring nail art lies not only in the vibrant colors and whimsical designs but also in the joy of personal expression that seasonal themes evoke. As nature awakens with blooming flowers and lush greenery, why not let your nails reflect this beautiful transformation? You don’t need to be a professional nail artist to create stunning designs at home; with a little guidance and creativity, your nails can become a canvas for springtime inspiration. In this article, we’ll explore fun and easy nail art ideas that will allow your personality to shine through while embracing the vibrancy of spring.
“Creating a cozy reading nook is all about maximizing comfort in a small space. It’s about intentional design that serves both function and feeling.”
– Interior Design Magazine
The Basics of Nail Art: Tools and Tips
Before diving into the world of spring nail art, it’s essential to gather the right tools and prepare your nails properly. Here’s a list of the essential nail art tools you’ll need:
| Tool | Purpose | Recommendation |
|---|---|---|
| Nail Brushes | For detailed designs | Look for fine-tipped brushes |
| Dotting Tools | To create dots and flowers | Available in various sizes |
| Sponges | For gradient effects | Makeup sponges work well |
Nail preparation is crucial for a flawless finish. Start by filing and buffing your nails to create a smooth surface. Apply a base coat to protect your nails and help the polish adhere better. Choosing colors that resonate with the spring theme is also important; think pastels, bright neons, and floral hues. Brands like OPI, Essie, and Sally Hansen offer high-quality polishes that are user-friendly and come in a dazzling array of colors.
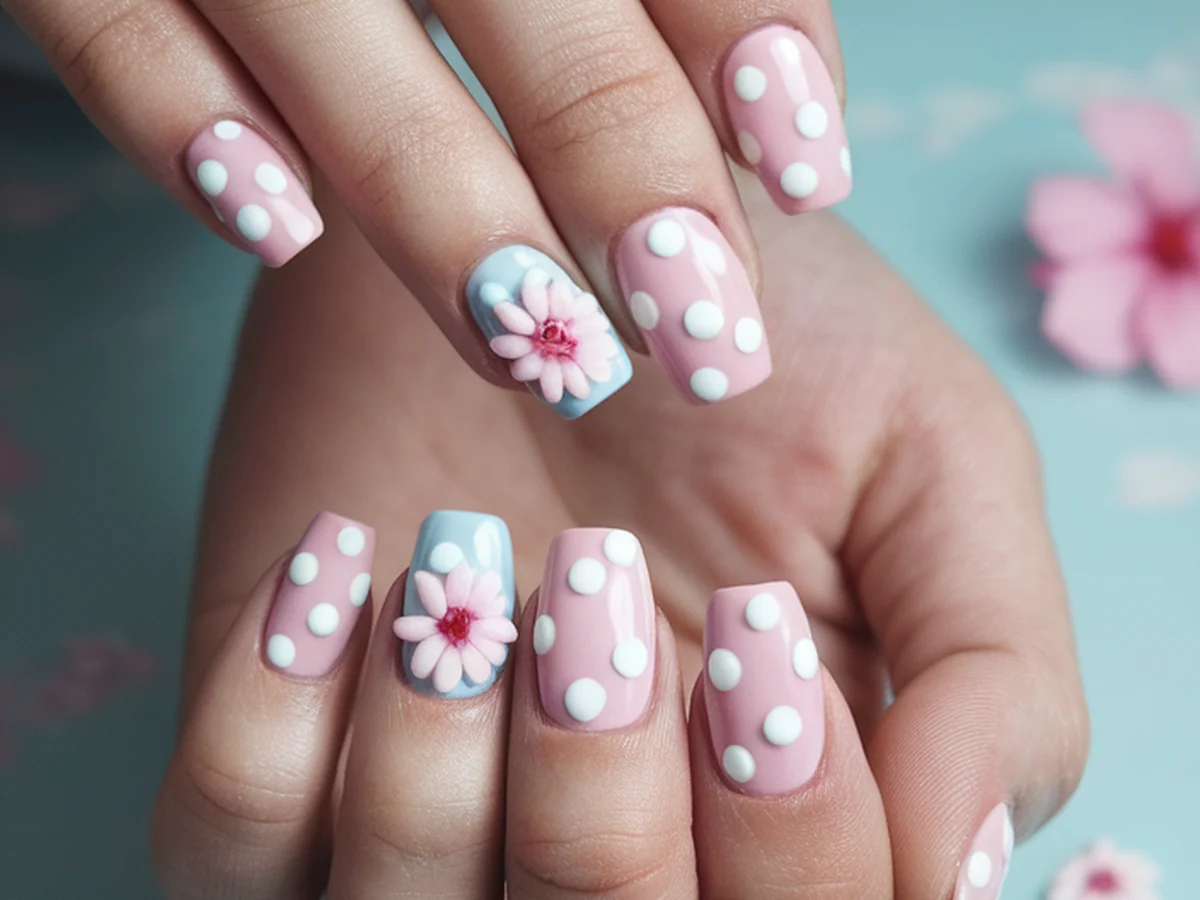
Floral Fantasies: Easy Flower Designs
Nothing says spring quite like flowers, and creating simple floral designs can add a cheerful touch to your nails. Here’s a straightforward step-by-step guide to help you create beautiful flower patterns:
1. Choose Your Base Color: Start with a light base color such as soft pink or sky blue. Apply two coats for full coverage and allow it to dry completely.
2. Create the Petals: Using a dotting tool or a fine brush, place five dots in a circular shape to form the petals. You can use different colors for variety—think pastel yellow for daisies or bright red for tulips.
3. Add Centers: Use a contrasting color to dot the center of each flower.
4. Finish with Leaves: Add small green strokes around the flowers to mimic leaves.
Flower types can vary; consider trying daisies, tulips, or even cherry blossoms for a delicate touch. For those who want to simplify the process, nail stickers or stamps can create intricate designs without the fuss.
Pastel Perfection: Soft Color Palettes
Pastels are undeniably trendy during spring, offering a soft and dreamy aesthetic. Creating a gradient effect with pastel shades can elevate your nail art to the next level. Here’s how to master this look:
1. Select Your Pastel Palette: Choose three or more pastel shades that complement each other—think lavender, mint green, and baby pink.
2. Apply Base Colors: Paint each nail with one of the selected pastel colors, ensuring even coverage. Allow them to dry thoroughly.
3. Create a Gradient: Use a makeup sponge to dab on each color, blending them together. Start with the lightest shade at the cuticle and transition to darker shades towards the tip.
4. Mix and Match: For added flair, consider using negative space designs. Leave a portion of your nail unpainted to create a modern twist.
Pastel colors can complement each other beautifully, and they provide a soothing backdrop for any spring outfit.
Nature-Inspired Themes: Leaves and Vines
Spring is synonymous with renewal, and what better way to celebrate the season than through nature-inspired nail art? Painting leaves and vines can create a fresh, organic look. Follow this guide to bring the outdoors to your fingertips:
1. Choose a Base Color: Light beige or soft grey can serve as a lovely backdrop for your greenery.
2. Paint the Leaves: Using a fine brush, create leaf shapes in various shades of green. Layer different greens for depth and interest.
3. Add Vines: Use a darker green to paint thin, curvy lines for vines. This adds a touch of whimsy to your design.
4. Background Colors: Consider using a light blue or soft yellow as a background to enhance the natural theme.
Textures and finishes can also play a significant role. A matte top coat can give your design a soft, sophisticated look, while a glossy finish adds shine and vibrancy.
Geometric Patterns: Modern Spring Styles
If you’re looking for a chic and contemporary look, geometric nail art is the way to go. This style can be both playful and sophisticated, making it perfect for spring. Here’s how to create stunning geometric designs:
1. Choose Your Colors: Select a color palette that reflects spring, such as pastel shades or bright colors.
2. Create Clean Lines: Use tape to outline shapes. This could be triangles, stripes, or polka dots. Apply your base color and allow it to dry.
3. Fill in the Shapes: Once the tape is removed, fill in the shapes with contrasting colors for a bold effect.
4. Combine Patterns: Feel free to mix different geometric patterns on each nail for a fun, eclectic look.
Utilizing tape can help you achieve clean lines, making it easier to create intricate designs without a steady hand.
Seasonal Celebrations: Nail Art for Spring Holidays
Spring is filled with celebrations, from Easter to weddings, and each offers a chance to showcase your creativity through nail art. Here are some delightful ideas for holiday-themed designs:
1. Easter-Inspired Art: Think bunnies, eggs, and spring flowers. Use light colors and cute designs to create festive nails.
2. Spring Weddings: Soft florals or elegant minimalist designs can be perfect for a wedding. A light pink with white lace detailing can add a touch of class.
3. Earth Day Designs: Celebrate Earth Day with designs featuring the planet, leaves, and nature themes. Consider earthy tones like browns and greens to reflect the beauty of our planet.
Personalizing your designs for various celebrations can make your nail art even more special. Consider using special colors or symbols that resonate with the occasion.
Textured Trends: Adding Dimension to Your Nails
Textured nail art can add a unique touch to your spring designs. Whether you prefer a sandy finish, glitter, or matte polish, these techniques can help your nails stand out. Here’s how to create a textured look:
1. Choose Textures: Decide on the texture you want—matte, glitter, or sand. Each offers a different feel and visual appeal.
2. Applying Textured Polish: Apply a textured polish or a layer of regular polish followed by a top coat that provides the desired effect.
3. Combining Textures: You can mix textures within one design. For example, try a matte base with glitter accents for a striking contrast.
Using a good top coat is vital for maintaining the look and preventing chipping, so don’t skip this step!
Nail Art Maintenance: Keeping Your Spring Look Fresh
After you’ve spent time creating your beautiful spring nail art, it’s essential to keep it looking fresh. Here are some tips for maintaining your designs:
1. Protect Your Nails: Apply a top coat every few days to maintain shine and prevent chipping.
2. Touch-Up Products: Keep a small brush and matching polish handy for quick touch-ups on any chips.
3. Nail Care: Maintain healthy nails by using cuticle oil and moisturizing regularly to keep your nails and skin hydrated.
4. Safe Removal: When it’s time to remove your nail art, use an acetone-free remover to prevent damage to your nails.
By taking these steps, you can extend the life of your spring nail art and keep your nails looking fabulous.
Conclusion
Creating spring-themed nail art at home is not only enjoyable but also a wonderful way to express your personality and creativity. With the right tools and techniques, you can easily experiment with various designs, from floral fantasies to modern geometric patterns. So, gather your supplies, choose your favorite colors, and let your imagination run wild! Don’t forget to share your creations on social media with friends and family. We’d love to see what you come up with! If you want to stay inspired and learn more nail art ideas, be sure to subscribe for future tutorials and tips.
Frequently Asked Questions
What are the best nail polish brands for beginners?
When starting out in nail art, it’s essential to choose user-friendly nail polish brands. Some of the best options for beginners include OPI, Essie, and Sally Hansen. These brands offer a wide range of colors, good coverage, and easy application. They also have quality formulas that last longer without chipping, making them ideal for those new to nail art.
How can I create intricate designs without a steady hand?
If you find it challenging to create intricate designs, consider using nail stickers or stencils. These tools can help you achieve professional-looking results without the need for a steady hand. Additionally, practicing on paper or using a nail wheel can help improve your skills before applying designs to your nails.
How do I remove nail art without damaging my nails?
To safely remove nail art, soak a cotton ball in acetone-free nail polish remover and press it against your nail for about 10-15 seconds. This will help dissolve the polish. Gently wipe the cotton ball downwards to remove the polish. Avoid scraping or pulling, as this can damage your nails. Always follow up with moisturizer or cuticle oil.
Can I mix different nail art styles?
Absolutely! Mixing different nail art styles can create a unique and personalized look. For example, you can combine floral designs with geometric patterns or add textures to a pastel gradient. The beauty of nail art lies in its versatility, allowing you to express your creativity in countless ways.
How often should I touch up my nail art?
Touching up your nail art depends on your daily activities and the wear and tear your nails endure. Generally, applying a fresh top coat every two to three days can help maintain shine and protect your design. If you notice any chips or wear, it’s a good idea to do a quick touch-up to keep your nails looking their best.